Showing posts with label practicality. Show all posts

Saturday, August 8, 2015

Central heating: overview and numbers

Here's the last of the central heating info - we haven't had a power bill yet so will update with approximate running costs when we get that, but for now I thought I'd summarise what we think and how much it cost.

The highly attractive heating unit, just after we started the ducting

The system we chose is the Rinnai iHeat. It's a ducted system, so blows warm air into the rooms. The air is warmed by water from the Infinity water heater we installed (which will also eventually serve both bathrooms and the kitchen).

Pros:

  • Keeps the whole house warm when we have the system turned on
  • Warms the house up pretty quickly (much quicker than a heat pump or fire)
  • Cheapest option for whole-house heating
  • Ceiling vents are unobtrusive
  • Very quiet
  • Efficient (and hopefully cheap to run!)
Cons: 
  • Blown air is not quite as nice as radiant heat
  • Can't control zones separately - one thermostat for the whole house
We have made a few tweaks to improve performance, and have a couple of other things we're planning to do in the longer term as well. 

Behold the button-thing, by which the vents may be adjusted
Firstly, balancing is part of the set up, but basically just means varying how open the vents are. Each vent has a button-thing (technical term) in the middle which allows you to adjust flaps inside the grill. The flaps can be mostly closed (so almost no air flows through) or fully opened (so as much as possible comes in). To balance the system, i.e. try to get all the rooms evenly heated, you start with the rooms furthest away from the heating unit, fully opening their vents, and then work back towards the centre of the house, with the more central vents being progressively more closed. 

Despite balancing, the airflow downstairs isn't as good. There are three ducts for downstairs; one in our son's room; one in our room; and one in the future bathroom. The one in our son's room works pretty well, but is poorly located above the door. Since his door gets closed when he's napping, which is when it most needs to be warm, it works okay, but we'll monitor that for a while and may eventually move the vent. 

Our bedroom is served by a poorly installed piece of flexible ducting, adopted from the HRV. Our room is the least accessible, ducting-wise, so we plan to eventually (before next winter!) get a length of rectangular plastic ducting to replace the dodgy old stuff. Because it's a straight run but we don't have good access between the rafters to smooth out the flexible ducting we think this will make a big difference. 

The bathroom vent is currently capped, because the bathroom doesn't even have walls and we're not really interested in paying to heat the dirt under our house. Once the bathroom has been built and that vent is in action we imagine the downstairs will become a bit more temperate, but in the meantime we've still got a heat pump down there for colder days (it's probably been turned on - briefly - three times in the past two weeks). 

We noticed immediately after it was turned on that the roofspace was very hot when the system was running, and realised that some gaps in the metalwork of the heating unit meant heat was escaping unnecessarily. I rang Rinnai to check if we could stop up these gaps, and they said that was no problem, so long as we used an appropriately heat-rated silicon sealant - so out came the caulk gun and now hopefully we're not leaking money into the attic. ;-) 

Another possible future tweak is the addition of a damper so we could turn off rooms not in use. These can be operated by a wall switch and can close off a branch of the system. The advice on this is a bit conflicting - our gasfitter said the iHeat's computer would shut down if we used one, as it would detect the damper as a blockage in the system, but Rinnai's info says they can be used. We'll see how the running costs look and then potentially do more research on that one.

The position of the thermostat is the subject of some discussion - it's in the warmest area of the house, which is not ideal, but it is conveniently located... So again we're going to wait and see. Installation consisted of poking a bit of cable down the wall and plugging the wall unit into it, so if we decide it would be better somewhere else we just need to fish the cable out and dangle it down a different wall. 

Overall we're very happy - the thermostat is quite programmable, so it turns on before we get up in the morning and turns itself off at bedtime, and we are magically kept warm without even thinking about it. You can easily turn it off if you're leaving when it's programmed to be on, and you can increase the temperature and/or fans temporarily if you're feeling particularly cold. 

And the cost - well, it's a big outlay, yes, but overall not too bad considering the outcome. For us, well worth it. If you're looking for something similar but don't have reticulated gas available in your area I'd encourage you to look into heat pump central heating - slightly more expensive but still a lot more reasonable than a furnace system! 

Costs:
System install (Infinity water heater and iHeat system, including commissioning) - $10,547.88
Extra vents - $184.71
Electrical work - power to the Infinity and iHeat units, decommissioning heat pump - $500 (approx)
RJ45 cable and connector for thermostat - $16.80
Cable ties - $92
Recovered $$$ from sale of both HRVs and one heat pump (less Trademe fees) -  -$1748.27

Central heating installation
Budget: $10,000
Timeframe: 6 weeks (mostly waiting for gas to be hooked up)
Who did the work: Us (4 days), gasfitters (1.5 days), sparkies (half a day)
Actual cost: $9,593.12
Learnings: Installing ducting isn't very hard, though it is a bit unpleasant spending a lot of time crawling around in attics. Pay attention to how things are working after installation as small tweaks can make big improvements in performance and efficiency. 

Thursday, July 23, 2015

Keeping warm - the central heating edition

We are a day away from firing up our very own central heating system. It's a very un-Kiwi way of heating a home, but one that we hope will be both comfortable and efficient. I'll come back to how it works for us once it's up and running, but I wanted to share why we've chosen a central heating system instead of say, a heat pump or a fire.

When we moved into our house, it had two heat pumps and two HRV systems - one of each on each level. Both heat pumps did a good job of heating the rooms they were in. Unfortunately, the downstairs one is in our bedroom, which we prefer on the cool side anyway - 16-18 degrees is about right for sleeping, I reckon, so not much heating needed. Upstairs it was in what would have been the dining/living room for the previous owners, but will be dining/kitchen for us. Useful, but it leaves our lounge, the other three bedrooms, two bathrooms and hallway out in the cold.

And as for the HRVs - well, they did remove moisture from the air, but as I've written before, I'm not sold on the benefits of those systems; I prefer to minimise the moisture that ends up in the air and use the high-tech apparatus known to those in the trade as "windows" for ventilation.

We knew we'd have to do something about heating those extra spaces but it wasn't the immediate plan... Until we got into hot water.

Because we're adding a bathroom downstairs we knew we'd need some extra water heating at some stage, and since we're in the midst of relocating the kitchen, which (who knew?) involves plumbing, it made sense to look at water heating now, so that we don't end up running a whole bunch of new pipes and then needing to move them in a year or so.

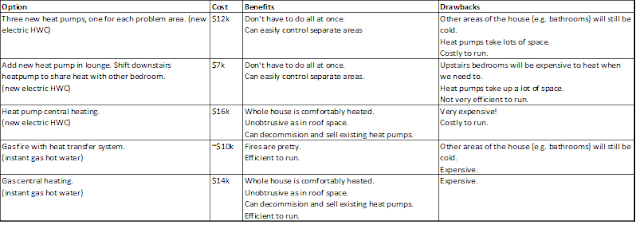
So we started investigating our options. As well as the water heating, we had three distinct problem zones for heating: our son's downstairs bedroom (which bears the brunt of the bitter southerly, straight off Cook Strait); the new lounge; and the two upstairs bedrooms. We went through a lot of different options, which all had complex costs and benefits associated. So we did what anyone would do; we made a spreadsheet.

All the coolest people run their life with spreadsheets

As you can see, all of the options we came up with were pretty costly. The cheapest option was about $7k, and that didn't serve the whole house very well. The top of the range isn't really shown here because we only looked at cheaper central heating options - I'm sure a radiator system would have taken us well over the $20k mark. 

Having read a bit about it before we got the quote, we had high hopes that the gas central heating system might come in at a reasonable price. It's a newish system (Rinnai iHeat) which works off the Rinnai Infinity water heater, which means the water heating cost is bundled into the total.

Disappointingly, at just shy of $14k it was well over our $10k budget. And then my husband had a stroke of genius: what if we were to run the ducting ourselves? We suggested it to the gasfitter and he agreed that might be a good option. We're grateful that he was pragmatic*, because when the quote came back it was nearly $3k cheaper, which made it make sense for us (not to mention that we do quite enjoy the DIY malarkey and find it more satisfying to be part of the process and understand how it all works).

It's more than we were planning to spend on heating in the short term, but it makes more sense to do it now than having to patch heat pump holes in our freshly painted walls in a year or two - and we should get over $1000 back by selling the heat pumps and HRVs. So net cost should be a smidge under $10,000. 

The moral is: it's expensive, but actually not that crazy if you have several areas in your home that need heating. And for goodness' sake if you're thinking of installing two heat pumps and two HRVs think about whether central heating might make more sense! We feel quite sad that the previous owner spent all that money for very localised comfort when he could have had the whole house toasty.

Have you ever thought about getting central heating? If you have it, how do you find the running costs?


* understandably many tradies don't want DIY wannabes like us doing half the job, lest we try to blame them for our own ineptitude

Friday, June 19, 2015

Designing a kitchen

We're in the midst of overhauling our kitchen at the moment (there will be many more posts relating to this, I'm sure!), and to me designing a new kitchen is one of the most fun parts of a renovation. Partly this is because of how transformational it is – a dowdy kitchen somehow seems to pull a whole house down – but also because there are so many parts to fit together, and activities to sequence. It’s proper project management and I love it!

This is the second time we’ve designed a kitchen, and I thought I’d share how I go about the planning – though two kitchens obviously doesn’t make me a pro, I’ve done a ton of research so hopefully have something helpful to share.

1.       Think about the goals
Everyone has different priorities, and while it’s usually sensible to keep your house reasonably normal for resale value (even if you’re planning to be there for a long time circumstances can change!) it’s most important to make it work for your family. For us, the main goals were:
  • The kitchen being central to family life. This means it’s moving to an entirely different location within the house – a consent-requiring change – but that expense will pay off massively for us in liveability.
  • Having plenty of working space – enough room for at least 2-3 people to be chopping side by side.
  • Keeping it social. This kind of fits in with the first part but has also given us a wee breakfast bar area so that friends can chill out in the kitchen if we’re hosting.
Your priorities will probably be different to ours, so have a think and write them down at the start to make sure your planning continues to line up with them. 

2.       Look at the space you have available
Depending on your house there might be major work required, like removing a wall or shifting location within your house – or you might be able to make improvements within the existing space. Note that moving your kitchen to a different location within your house requires a building consent in New Zealand, whereas upgrading an existing kitchen (assuming you're not moving any structural or bracing walls) does not. 

3.       Work out what components are required
List out the appliances and services (oven and cooktop, sink, dishwasher, fridge, microwave), and how much storage you think you need. If you have an existing kitchen which provides enough storage make a list of the storage units and sizes – you can then use this to compare with your new plan to ensure you’ll still have enough room for everything.

4.       Draw a plan
You can use software (I use Microsoft Visio which isn’t perfect but works – and there are lots of free programs online) or go old school with pencil and paper. If you go the paper route I recommend making scale cut outs of your cabinets and appliances (or getting one of the Bunnings / Mitre 10 planning brochures you can cut out) so you can move them around the page without having to draw new versions constantly. 

My very unprofessional but serves-the-purpose kitchen plan.
The weird gaps represent dead space under the benchtop but won't be visible. 

I like to spend a few weeks on this – I come up with some ideas, then mull them over for a few days, tweak (or completely reconfigure) and then rinse and repeat until I can’t think of any improvements. It's also worth spending a bit of time reading up on kitchen design tenets (plenty of info readily available online) as there might be important factors you've overlooked, like making sure there's enough room to open the dishwasher. 

A few tips and pointers: 

  • Some cabinets need extra buffer panels - for example corner cabinets usually need this. If space is constrained (e.g. if your cabinets run wall to wall) you'll want to confirm this before you finalise the plan to ensure you don't run out of room. 
  • End units will need end panels or some other type of finishing except where they butt up to walls. You don't have to buy the purpose-made panels (we like to build our cabinets in with gib and framing where required) but you'll want something and will need to allow space for these too. 
  • It's often easiest to do this with a list of the available cabinets and dimensions on hand - if you know where you'll get your cabinetry from get their price list, which will usually provide this info, or seek it out online. 
  • Cabinets can be custom-made into just about every size and shape but usually this comes at a premium. If you can, design for the standard sizes as much as possible - you may still end up needing one or two custom cabinets but that'll be much less costly than a whole custom kitchen. 
  • Google for ideas and design help - there's lots of info out there to help you along. 


5.       Confirm design factors 
There are lots of decisions to make – cabinet door shape and colour, handle type, wall colour, backsplash/tile colour, flooring materials, window treatments, benchtop material, lighting...

Google image search comes into play a lot in this stage too, and to avoid decision fatigue I take the easy route for things I don't feel strongly about. This can also help save the dollars - e.g. I scored some (barely) secondhand custom made curtains for the big kitchen window on TradeMe, much cheaper than getting new ones and they will be one of the biggest visual features. Obviously I couldn't choose the exact fabric - I had to accept one of the available options in the size needed (which can be a waiting game too). But now we have this bold feature it helps default some of the other decisions, like paint colour.  

6.       Source cabinetry and components
Cabinets can take a month or more to arrive so don't leave ordering them until the last minute. Also try to get orders in place for the other key components (like any major appliances) as early as you can. 

7.       Schedule the work
Plan out what needs to happen when - but leave some buffer time in your schedule, as there will always be something that crops up when you're not expecting it. 

It's smart to line up your key tradies (electrician, plumber, builder, plasterer, flooring specialist, is there a name for a benchtop person?) as if they're good at what they do it often takes a while to get into their calendar. 

Usually the sequence is something like this but sometimes things go in different orders depending on your design and specifics of your build: 

  • Any building work / electrical pre-wiring / plumbing pre-runs
  • Plastering & prep for painting
  • Painting
  • Installing cabinetry
  • Benchtop
  • Completing electrical work / plumbing
  • Flooring
8. Be prepared for disruption! 

This isn't critical for the success of the project, but is for your mental health. Get some strategies in place - maybe you can set up a semi-kitchen in another room to tide you over, maybe you can just eat instant noodles for a couple of months (no, don't do that!). 

As I write this we have a sink, very small bench and our hack dishwasher in one room, with our dishes, cutlery and food in boxes and trays on the floor, and oven, fridge and microwave in another room. The whole floor seems to have a permanent layer of dust and it's not very fun for cooking, nor is it child-friendly... But it's a means to a very worthy end! 


Have you lived through a kitchen renovation? Do you have any tips to help us along?