Friday, August 14, 2015

Kitchen - the benchtop

First things first: this will be my last post on this blog. But fear not! (she says conceitedly) I'm reviving my old writing home, and starting next week will be putting my renovation updates there, along with some recipes and other lifestyle stuff. I hope you'll join me over there... Sorry for messing with your reading platform. ;-)

I will move our to-do list and the posts I've written here over to that site so that I have everything in one place, but will still be writing a new house-related post a week and I'll do my best to make it easy for anyone who doesn't like food (is that a thing?) to jump straight to the reno stuff.

A much better texture than chipboard. 
Right, down to business - we now have a proper benchtop. Bye bye chipboard! Bye bye manky old stainless steel! Bye bye leaky taps! It's a pretty flash one - engineered stone - so was kinda pricey but I love it.

Not so much a DIY affair, but it does feel like a monumental step towards kitchen completion, and there was a fair bit of thinking in the process.

There are lots of options in the benchtop realm: granite, marble, engineered stone, stainless steel, treated wood of varying varieties, laminate. Last time around we went with a laminate top, which was fine, but we really like the look (and resilience) of stone so wanted to try that this time around.

Bramco supplied our bench - we got a couple of quotes and theirs was the cheapest, but our dealings with them were excellent so I'd highly recommend them on service as well. They have loads of options, but we narrowed it down to three samples, took them home and pretty quickly settled on white with a visible aggregate.

Can you see the join? 
Mostly for aesthetic reasons, but also to provide a nice high working surface, we wanted a 60mm thick bench. Stone comes in 20mm and 30mm thick sheets, so to get a thicker bench they mitre the corners and construct the edges from separate pieces to give the illusion the whole bench is 60mm thick. You can't tell unless you know - and I'm sure the folk who installed it were glad not to have to carry double the weight up the stairs.

We opted for a waterfall end on our peninsula (is that the most pretentious sentence so far in this post?). We were planning to gib the end, as we've done around the top cabinets, but that wouldn't have been as robust (it's a pretty high-traffic area) and the waterfall looks fantastic.


Our sink is this black composite stone double bowl model, which we ordered online. And the tap is a Methven Kiri. The arm of the tap doesn't stick out as far across the sink as I'd like but design won the day and it was still the right decision given the available options.


The installation took about two hours on a Friday morning - pretty quick - though because we opted for an undermount sink we had to wait 24 hours to hook up the plumbing (lest the pressure be too much for the partially cured adhesive).

I got to roll up my sleeves for the plumbing bit. My dad had plumbed in our temporary bench, so all the appropriate pipes were in place, but I got the honour of installing the new mixer tap on my own. I might have called him twice while I was doing it (which, as he'll tell you, is low call volume for when I'm on DIY duty) and I may possibly have connected the hot and cold backwards, but it works and the house did not flood. Winning!


(we don't have the second sink plumbed in yet, as that's beyond my very limited abilities - waiting for Dad to come visit us again)

What do you think? And do you think stone is worth the cost or do you prefer a different look?


Saturday, August 8, 2015

Central heating: overview and numbers

Here's the last of the central heating info - we haven't had a power bill yet so will update with approximate running costs when we get that, but for now I thought I'd summarise what we think and how much it cost.

The highly attractive heating unit, just after we started the ducting

The system we chose is the Rinnai iHeat. It's a ducted system, so blows warm air into the rooms. The air is warmed by water from the Infinity water heater we installed (which will also eventually serve both bathrooms and the kitchen).

Pros:

  • Keeps the whole house warm when we have the system turned on
  • Warms the house up pretty quickly (much quicker than a heat pump or fire)
  • Cheapest option for whole-house heating
  • Ceiling vents are unobtrusive
  • Very quiet
  • Efficient (and hopefully cheap to run!)
Cons: 
  • Blown air is not quite as nice as radiant heat
  • Can't control zones separately - one thermostat for the whole house
We have made a few tweaks to improve performance, and have a couple of other things we're planning to do in the longer term as well. 

Behold the button-thing, by which the vents may be adjusted
Firstly, balancing is part of the set up, but basically just means varying how open the vents are. Each vent has a button-thing (technical term) in the middle which allows you to adjust flaps inside the grill. The flaps can be mostly closed (so almost no air flows through) or fully opened (so as much as possible comes in). To balance the system, i.e. try to get all the rooms evenly heated, you start with the rooms furthest away from the heating unit, fully opening their vents, and then work back towards the centre of the house, with the more central vents being progressively more closed. 

Despite balancing, the airflow downstairs isn't as good. There are three ducts for downstairs; one in our son's room; one in our room; and one in the future bathroom. The one in our son's room works pretty well, but is poorly located above the door. Since his door gets closed when he's napping, which is when it most needs to be warm, it works okay, but we'll monitor that for a while and may eventually move the vent. 

Our bedroom is served by a poorly installed piece of flexible ducting, adopted from the HRV. Our room is the least accessible, ducting-wise, so we plan to eventually (before next winter!) get a length of rectangular plastic ducting to replace the dodgy old stuff. Because it's a straight run but we don't have good access between the rafters to smooth out the flexible ducting we think this will make a big difference. 

The bathroom vent is currently capped, because the bathroom doesn't even have walls and we're not really interested in paying to heat the dirt under our house. Once the bathroom has been built and that vent is in action we imagine the downstairs will become a bit more temperate, but in the meantime we've still got a heat pump down there for colder days (it's probably been turned on - briefly - three times in the past two weeks). 

We noticed immediately after it was turned on that the roofspace was very hot when the system was running, and realised that some gaps in the metalwork of the heating unit meant heat was escaping unnecessarily. I rang Rinnai to check if we could stop up these gaps, and they said that was no problem, so long as we used an appropriately heat-rated silicon sealant - so out came the caulk gun and now hopefully we're not leaking money into the attic. ;-) 

Another possible future tweak is the addition of a damper so we could turn off rooms not in use. These can be operated by a wall switch and can close off a branch of the system. The advice on this is a bit conflicting - our gasfitter said the iHeat's computer would shut down if we used one, as it would detect the damper as a blockage in the system, but Rinnai's info says they can be used. We'll see how the running costs look and then potentially do more research on that one.

The position of the thermostat is the subject of some discussion - it's in the warmest area of the house, which is not ideal, but it is conveniently located... So again we're going to wait and see. Installation consisted of poking a bit of cable down the wall and plugging the wall unit into it, so if we decide it would be better somewhere else we just need to fish the cable out and dangle it down a different wall. 

Overall we're very happy - the thermostat is quite programmable, so it turns on before we get up in the morning and turns itself off at bedtime, and we are magically kept warm without even thinking about it. You can easily turn it off if you're leaving when it's programmed to be on, and you can increase the temperature and/or fans temporarily if you're feeling particularly cold. 

And the cost - well, it's a big outlay, yes, but overall not too bad considering the outcome. For us, well worth it. If you're looking for something similar but don't have reticulated gas available in your area I'd encourage you to look into heat pump central heating - slightly more expensive but still a lot more reasonable than a furnace system! 

Costs:
System install (Infinity water heater and iHeat system, including commissioning) - $10,547.88
Extra vents - $184.71
Electrical work - power to the Infinity and iHeat units, decommissioning heat pump - $500 (approx)
RJ45 cable and connector for thermostat - $16.80
Cable ties - $92
Recovered $$$ from sale of both HRVs and one heat pump (less Trademe fees) -  -$1748.27

Central heating installation
Budget: $10,000
Timeframe: 6 weeks (mostly waiting for gas to be hooked up)
Who did the work: Us (4 days), gasfitters (1.5 days), sparkies (half a day)
Actual cost: $9,593.12
Learnings: Installing ducting isn't very hard, though it is a bit unpleasant spending a lot of time crawling around in attics. Pay attention to how things are working after installation as small tweaks can make big improvements in performance and efficiency. 

Friday, July 31, 2015

Central heating - running the ductwork

Our gas got hooked up a week ago, which means we've had seven blissful days of a temperate, evenly heated house. 

Before that could happen we had to run the ducting, as part of the deal we struck with the gasfitter. This took us a few days - partly because our work is often interrupted by a small person, and partly because we hadn't done it before so were working things out as we went. 

The first, doubtful join
The first snafu was on the very first join. We put the small one down for a nap, climbed into the roofspace, got the duct tape out... And second-guessed ourselves. The gasfitter had given us a quick lesson on how to tape the ducts up when he brought the kit around, but we wanted to refresh ourselves. So we googled. And (possibly for the first time ever), it wasn't helpful. 

Ducted central heating is most common in the United States - but all the US videos we found recommended against using duct tape, instead suggesting mastic glue and cable ties (the adhesive on the tape softens when exposed to heat, meaning the tape can let go when the system is in use). However, the videos all used metal junctions (ours are plastic) so we weren't sure if the advice translated to us. 

After a bit of (read: extensive) discussion and a chat to the gasfitter (who stood by the use of tape only) we decided we would get some cable ties, and use them with the tape for good measure. 

(aside: it seems ridiculous calling them "cable ties" when they are wrapped around a 350mm diameter duct, but - correct me if you know otherwise - that seems to be the term used here. I guess sometimes bunches of cables might get that large?)

Once we got into it, running the ducting was pretty simple: the objective is to keep the runs as straight and smooth as possible, so a little bit of thinking ahead is advisable. Though not what we did, with the benefit of hindsight I'd recommend laying out as many ducts as you can to see where they sit before connecting any. As well as trimming the ducting to length, hanging bendy bits (e.g. where it joins the ceiling vents) to ease the angle of the bend is recommended. 

This is a mostly-done shot - we hadn't finished hanging the ducts yet.
It's very hard to get good shots of how they run because everything's a bit crowded up there.
We were hoping we might be able to reuse some of the ceiling vents from the HRV, but these weren't ideally placed; most of them were close to doorways, and the heating vents are supposed to be as close to the outside of the room as possible. We have reused one upstairs, in the dining room / kitchen, which has three vents in total so one in the middle made sense, and currently both downstairs bedrooms are using the HRV holes, because we were loath to cut new holes in the recently painted, good condition gib... But we'll see how performance goes and move them if we need to. 

The trickiest part of vent placement is working out where they can sit - that job really needs two people, so one person can check out location in the room and the other can check for joists etc in the roofspace above. We did a bit of knocking and talking to try to roughly work out where we were, and then I would drill a hole from below in the centre of the proposed vent hole. My husband would then check from his side that the hole wouldn't hit anything and if it was good I'd draw a circle (the vents came in boxes which included a template, very helpful, though we could have made our own). 

Once the hole is there you poke the duct down through it, tape/cable tie on the vent, and push it into the hole. We also had to do a bit of jiggery-pokery (technical term) on a few of the holes, as our old house has several double ceilings so the clips on the vent didn't always work as perfectly as they ought. 

We also had to construct a return air duct - basically a chimney which takes the cooler air back up to be heated again. This has to be central (and is a large part of why the outlets need to be on the outside) so has consumed a large part of our hall cupboard. Our box is built out of MDF and chipboard; MDF on the visible side, for a good paint finish, and chipboard because we had a lot of it going to waste and it will do just as good a job. The most important functional outcome was for the box to be airtight, so plenty of sealant has been applied to all the joins. 


Because we would have boxed it in anyway we chose to build the box to the top of the cupboard and attach the duct at ceiling level, rather than ducting from lower down.


The inlet vent, which is mounted on the size, sits in a nice, snug hole - it has to be removable so the filter can be cleaned, so the lesson here is measure twice, cut once! Once the wall had a hole in it we cut pieces of MDF to line the cavity so the air goes into the box rather than up the wall. 

This is the least pretty part - the big return air vent - but it's no worse than a heat pump... I guess most heating systems have ugly bits.

We're pretty happy with how it runs - we're still fine-tuning a little but it's glorious to get up to a warm house... We are keen to see our first gas bill though!

I'll share a bit more about the pros and cons, the fine-tuning process and costs next week... Stay tuned!

Thursday, July 23, 2015

Keeping warm - the central heating edition

We are a day away from firing up our very own central heating system. It's a very un-Kiwi way of heating a home, but one that we hope will be both comfortable and efficient. I'll come back to how it works for us once it's up and running, but I wanted to share why we've chosen a central heating system instead of say, a heat pump or a fire.

When we moved into our house, it had two heat pumps and two HRV systems - one of each on each level. Both heat pumps did a good job of heating the rooms they were in. Unfortunately, the downstairs one is in our bedroom, which we prefer on the cool side anyway - 16-18 degrees is about right for sleeping, I reckon, so not much heating needed. Upstairs it was in what would have been the dining/living room for the previous owners, but will be dining/kitchen for us. Useful, but it leaves our lounge, the other three bedrooms, two bathrooms and hallway out in the cold.

And as for the HRVs - well, they did remove moisture from the air, but as I've written before, I'm not sold on the benefits of those systems; I prefer to minimise the moisture that ends up in the air and use the high-tech apparatus known to those in the trade as "windows" for ventilation.

We knew we'd have to do something about heating those extra spaces but it wasn't the immediate plan... Until we got into hot water.

Because we're adding a bathroom downstairs we knew we'd need some extra water heating at some stage, and since we're in the midst of relocating the kitchen, which (who knew?) involves plumbing, it made sense to look at water heating now, so that we don't end up running a whole bunch of new pipes and then needing to move them in a year or so.

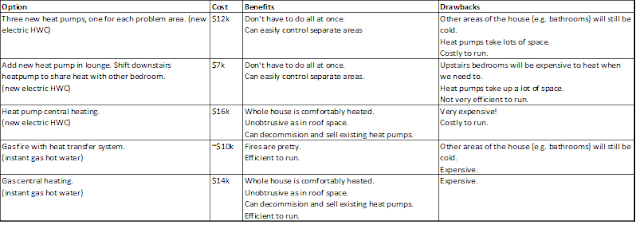
So we started investigating our options. As well as the water heating, we had three distinct problem zones for heating: our son's downstairs bedroom (which bears the brunt of the bitter southerly, straight off Cook Strait); the new lounge; and the two upstairs bedrooms. We went through a lot of different options, which all had complex costs and benefits associated. So we did what anyone would do; we made a spreadsheet.

All the coolest people run their life with spreadsheets

As you can see, all of the options we came up with were pretty costly. The cheapest option was about $7k, and that didn't serve the whole house very well. The top of the range isn't really shown here because we only looked at cheaper central heating options - I'm sure a radiator system would have taken us well over the $20k mark. 

Having read a bit about it before we got the quote, we had high hopes that the gas central heating system might come in at a reasonable price. It's a newish system (Rinnai iHeat) which works off the Rinnai Infinity water heater, which means the water heating cost is bundled into the total.

Disappointingly, at just shy of $14k it was well over our $10k budget. And then my husband had a stroke of genius: what if we were to run the ducting ourselves? We suggested it to the gasfitter and he agreed that might be a good option. We're grateful that he was pragmatic*, because when the quote came back it was nearly $3k cheaper, which made it make sense for us (not to mention that we do quite enjoy the DIY malarkey and find it more satisfying to be part of the process and understand how it all works).

It's more than we were planning to spend on heating in the short term, but it makes more sense to do it now than having to patch heat pump holes in our freshly painted walls in a year or two - and we should get over $1000 back by selling the heat pumps and HRVs. So net cost should be a smidge under $10,000. 

The moral is: it's expensive, but actually not that crazy if you have several areas in your home that need heating. And for goodness' sake if you're thinking of installing two heat pumps and two HRVs think about whether central heating might make more sense! We feel quite sad that the previous owner spent all that money for very localised comfort when he could have had the whole house toasty.

Have you ever thought about getting central heating? If you have it, how do you find the running costs?


* understandably many tradies don't want DIY wannabes like us doing half the job, lest we try to blame them for our own ineptitude

Saturday, July 18, 2015

Streamlined kitchens

We're pretty fond of a fairly minimalist, modern, and streamlined look, especially for kitchens. This week's job has been building our kitset cabinets into the surrounding walls to hopefully achieve something close to that.

This is both an aesthetic preference and a practical one; two metre high cabinets in a 2.7m high room leave a nasty dust-and-grease gathering gap that I am not at all a fan of. One way to solve this problem (at great expense) is to get custom made cabinetry built in for you by a carpenter. That's expensive.

Another way is to buy kitset kitchen cabinets and build them in yourself!

This does take a bit of skill, which we're still gaining but luckily we had my dad here helping (read: taking charge) this week.

It's also time-consuming; it took Dad and I three days, though we did also get a couple of other small things done in that time. I won't pretend to be the world's best apprentice, but hopefully I still sped things up!

My first accomplishment of the week was breaking one of our windows... Well, really it broke itself, the frame split and came clean off its hinges when I opened it. But it still slowed us down a bit... It's not really warm enough at the moment to leave a giant hole in the wall overnight.

Gorilla glue and duct tape got us there in the end... Super pro solution but it worked! 

Anyway, our cabinet fancifying technique (which we've now applied to two kitchens) is basically to build little walls around the top of each tall bank of cabinets, and then gib them in.

It can be pretty fiddly, especially in an old house where nothing is square, but (to me) the end result is well worth it, and takes the bog-standard cabinetry up a few pegs, as well as eliminating a few surfaces off the cleaning schedule, which is always welcome around here!

(side note: I love the look of open kitchen shelves, which are pretty popular at the moment, but just can't come to grips with all the dusting)


The first step was to slightly move the pantry. Because (naturally) I had changed my mind. I had originally thought I wanted the gib flush with the cabinet carcass and the doors sitting forward... And then decided that for the pantry and oven that the gib should be flush with the doors. So all the screws came out of the pantry, and some of the food I'd enthusiastically packed into it had to come out so we could scoot it back 10mm to permit everything to line up. On the bright side, I do think it looks good, and we gained 10mm of extra floor space in our kitchen. Woop woop! 10mm!

Step two was attaching the over fridge cupboard to the pantry, and then we did the timber framing up top. This follows standard wall construction methods, with a bottom plate (on the cabinet), top plate and studs. Remember to leave a 10mm allowance for the gib if you're picky about where it sits... I am. ;-)


Then we had to patch the messy bit of ceiling above the pantry where we'd changed the ducting. Although this is completely closed in from the kitchen I'd rather not have any risk of roof-dwelling creatures invading the space behind the pantry. So our brand new jigsaw (because what would a week of DIY be without a new power tool?) got its first workout and the ducting is nice and snug now.

We also made a side panel to box the ducting in behind the pantry, and a sort of lid that sits above the fridge, because it's a bit more complete that way and it'll help us keep all our precious heat in the bits of the room we're using.


Because we didn't want to lose any more room than we had to to wall framing, and the fridge cabinet was firmly secured from above, we chose to make the wing wall out of MDF. The framing at the top is the same as for the other cabinets, and at the bottom it's secured with little brackets screwed into the floor. These will be hidden by the fridge (and are the same as are used with standard melamine kitchen panels - which wouldn't have been tall enough and wouldn't be paintable so got vetoed).

Please don't rob us - we don't really have any valuables, the safe is for chocolate and (sadly) is empty anyway... 
Then the gib went on - another fiddly job. To keep the edges neat we used metal external corners and capping so that we can neatly stop and paint up to the cabinet (masking tape will be involved in that job, methinks!).

I guess maybe you want to see some photos? I forgot to tuck our super flash duct tape drawer handles away for these ones so apologies... Real handles coming soon!


And so the next job for the kitchen is some plastering and more painting. But first we need to finish the ducting for our gas central heating before the gas gets hooked up on Thursday (oh how glorious it will be to have a warm house and hot water to the kitchen taps!).

What do you think of our weird kitchen building technique? Will it catch on? Or are you happy dusting the tops of cabinets to avoid the extra building work? ;-)

Wednesday, July 8, 2015

Kitchen - the cabinets go in, part 2

I left you kind of hanging yesterday - sorry about that. I thought I'd elaborate a bit with some tips on installing your own kitchen cabinets in case you want to give it a go.

First recommendation: check out the Mitre 10 guide - it's pretty helpful and gives a general overview, complete with snazzy videos. Our cabinets are not from Mitre 10 so a few details differ a bit (our soft-close drawers are a bit harder to assemble for example) but the principles stand, and wherever you get your cabinets from they should come with instructions anyway.

You do need a few tools and though it's possible to do on your own I would recommend working with someone on this - moving the cabinets around is much simpler with a teammate.

The general steps are:

1. Prepare the area
  • Remove old cabinetry
  • Repair, prep and paint walls
  • Repair floor as required
  • Have new plumbing and electrical work run as required
2. Assemble the cabinets
  • Put everything together per the instructions 
  • Work out your starting point. This will usually be a corner, since it's fixed - in our case it's the dining room end as our peninsula bit is floating and therefore that end was flexible, whereas there was a specific position we wanted for the other end. 
  • Put the first cabinet in place and adjust the feet so it's roughly level, with about 150mm between the bottom of the cabinets and the floor.
  • Put the next cabinet beside it and level it up. Repeat until all the cabinets are in position. 
  • Check the level across the first two cabinets, and adjust feet until both are level with each other (and overall). Fix them together. Repeat until all cabinets are joined. 
  • Double and triple check the levels. 
  • Fix cabinets to the walls. 
All set up - photos taken from either end of the room. 
The view from the window isn't so flash but that plumbing is very temporary!

I disagree with a couple of Mitre 10's points - it depends what you're doing to the floor but this is often best done last (or at least finished last, as in our case with the refinished floorboards). Likewise usually you'd save doing your paint top coat until after the bench has gone in because it'll probably get scuffed (I guess you can touch up but it looks better if it's a proper coat).

Once these steps are done you (like us) will be ready for your bench to go in. We're still waiting for that so in the meantime we have some chipboard and the manky stainless steel bench from the old kitchen. It's plumbed in as a temporary measure - I'll share how to rig that up soon too, along the same lines of the dishwasher setup we had. 

Our design had the fridge sitting flush with the pantry, and a cabinet over the fridge... But we're now not so sure about this. The pantry sticks out into the room quite a bit due to ducting behind it, and the fridge could go back about 200mm, which will let more light into the room. But that would create a stepped effect on that side, which I'm not a fan of - I'd rather have everything in smooth lines. So we haven't installed that last lonely cabinet yet - we need to make a call on that.


Also in the not-quite-finished category: I somehow ordered frosted glass for our wall cabinets, which is not at all the look we were going for. Surely the point of glass is being able to see what's inside! So those need to be reglazed. The rangehood will go in between, and we plan to tile the backsplash behind the rangehood and across the wall underneath those two cabinets.

The sparky is coming tomorrow, which means we'll get our wall oven installed, hopefully the hob set up on our fake bench, and the other kitchen wiring (microwave, dishwasher, rangehood, wall powerpoints, pantry powerpoint) completed so we're not running the whole kitchen off a single multi-box. That'll also mean I can sell the freestanding oven (anyone in the market for one? It's barely been used!) which will make the room feel a bit bigger.

Slowly but surely it's coming together. What do you think we should do about the over-fridge cupboard?

Tuesday, July 7, 2015

Kitchen - the cabinets go in, part 1

Sorry I've been a bit quiet - there's a bit of a problem with blogging renovations, and that is that when you're in the midst of the exciting stuff you're way too busy renovating to blog about it. It doesn't help if you smush a first birthday party into the middle, either (although it does help us overall since that meant lots of awesome family help for us, due to birthday visits).


Since the floor was done a couple of weeks ago we've been waiting for the kitchen cabinets to arrive. We had family arriving on Thursday afternoon; we were hoping the kitchen cabinets would arrive before that so that we'd have a chance to put the pantry in and put some things away, to free up valuable floor space. Technically they did arrive before the first guests but only by about five minutes and none of them were off the truck yet!

However, since it was my parents who were the unlucky first, the pantry was in place before anyone else arrived because my dad is not one to rest on his laurels, even when he's purportedly on holiday. The timeline was something like this:

Thursday: cabinets arrive and are stacked in the corner and ignored while our house guest helps to assemble his own bed (a Murphy bed! More on that in another post sometime).
Friday: Pantry installed, some cabinets assembled and roughly placed in position. Other odd jobs done, mainly by our guests. We should have people to stay more often!
Saturday: Remaining cabinets assembled and placed in position. Some plumbing for new kitchen done. Manic cake baking and party preparations. First birthday party for our small person. We survived a whole year! He hasn't eaten any screws yet! Woohoo!
Sunday: Sort of rest day. Some tweaking to cabinet positions, other bits and pieces. Family time.
Monday: Cabinets properly leveled and fixed in place. Plumbing completed, dishwasher installed and temporary sink (from old kitchen) installed.

Thursday afternoon / Saturday morning / Sunday morning 

Our cabinets are from iKitchen, same as last time - we like them! They have various cabinet door options (and will send you swatches for you to check out) and we like the thermowrapped gloss doors - easy to keep clean and look fresh, but also won't date too quickly. This time around we looked at getting a profile door (think farmhouse kitchen or tongue and groove) but couldn't agree on a profile, felt it might look too busy and the profile doors are more expensive so in the end went back to the plain gloss finish.

The cabinets were just over $6k including delivery - a pricey part of the job but pretty good value considering what we got. Our kitchen includes a few slightly high-brow features including drawers in the pantry, a fancy-pants pull-out for the corner cupboard and some glazed wall cabinets (which I made a mistake on so need to be re-glazed, oops). They come flat-packed (with a couple of exceptions), or you can pay 10% extra and have them all delivered fully assembled. We're cheap so you know what we chose!

The kids were all pretty keen to help too!

Installing cabinets is more time consuming than you might think, and there are some tools which are essential for a good result, but it's completely achievable for a competent DIYer. That's not really us but we had my dad's help. ;-)

I have lots more photos and detail but perhaps will aim for installment two tomorrow so that I can go and put my feet up now that we have the house to ourselves for the first time in a while. Lazy, huh?